
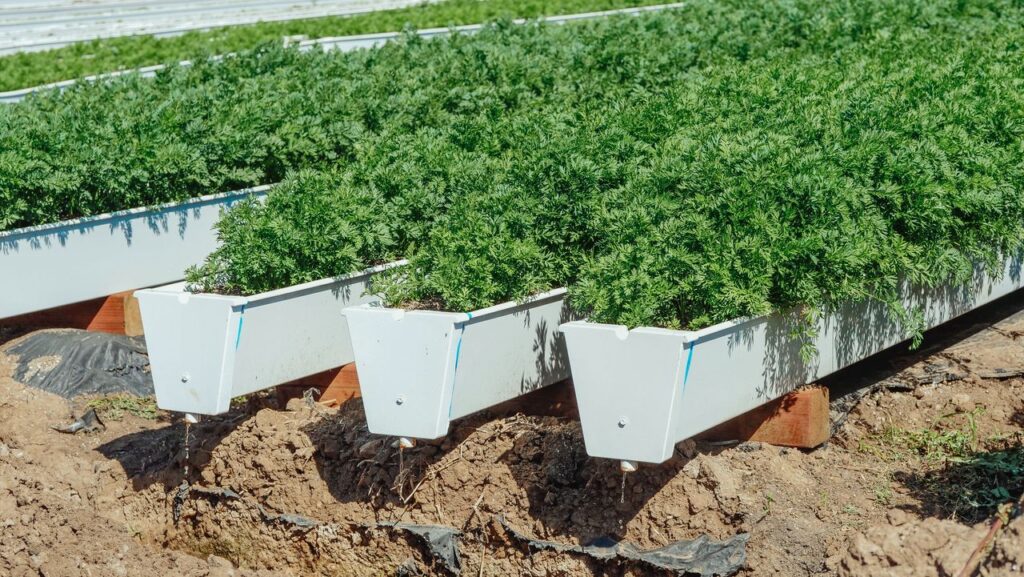
A wicking bed can dramatically reduce how often you need to water a raised vegetable garden, but building one for Malaysia requires thinking about something gardeners in dry climates may worry about less: what happens when it suddenly rains heavily for several hours?
A successful Malaysian wicking bed must do two opposite jobs.
During hot, dry weather, it needs to store enough water beneath the soil for plants to access gradually.
During heavy tropical rain, it needs to release excess water quickly enough to prevent the root zone from becoming waterlogged.
Get those two functions right, and a wicking bed can become a practical self-watering system for chillies, tomatoes, brinjal, leafy vegetables, herbs, cucumbers, and many other edible crops.
Understand the Basic Structure First
A simple wicking bed is built in layers.
At the bottom is a waterproof reservoir.
Above or within that reservoir is a coarse material or purpose-made structure that creates space for storing water.
A suitable separator prevents the growing soil from collapsing excessively into the reservoir.
Above that sits the growing medium.
You also need:
a fill pipe for adding water,
an overflow outlet for controlling the maximum water level,
and a sufficiently strong bed structure to hold everything.
Water stored below moves upward through the growing medium by capillary action as the upper soil becomes drier.
Step 1: Choose the Location Carefully
Build the wicking bed where your vegetables will receive suitable sunlight, but also consider rainfall and surrounding drainage.
Avoid positioning it directly under a roof downpipe unless you deliberately design the system to handle that extra volume of water.
Also check the ground beneath the bed.
Even though the reservoir itself is contained, overflow water still needs somewhere to go.
If the outlet empties onto an already waterlogged corner beside your house, you have simply moved the drainage problem.
Ideally, overflow should discharge somewhere water can safely drain away.
Step 2: Build a Strong Raised-Bed Frame
Wicking beds become extremely heavy.
You are combining:
water,
wet growing medium,
reservoir material,
plants,
and the weight of the structure itself.
Timber, masonry blocks, bricks, concrete, galvanised steel, or other durable raised-bed materials can be used depending on your budget and design.
If you use timber, remember that constant moisture and Malaysia’s humidity can accelerate deterioration.
Choose appropriate materials and avoid untreated products that may break down quickly.
For edible gardens, also avoid questionable reclaimed materials that may contain paints, preservatives, oils, or other contaminants.
Step 3: Create the Waterproof Reservoir
The lower section of the bed must hold water.
One common DIY approach is to line the inside with a strong pond liner or another waterproof material specifically suitable for long-term water containment.
Inspect the base carefully before installing the liner.
Sharp stones, screws, or rough edges can puncture it.
You may want a protective underlayer between the frame and liner.
Fit the liner gently rather than stretching it extremely tightly into the corners.
Once the bed is full, the pressure from water and growing media can be significant.
A small leak at the bottom can turn your carefully constructed reservoir into an ordinary raised bed.
Step 4: Install the Overflow Before Filling Anything
For Malaysian weather, this may be the single most important part of the build.
The overflow outlet determines the highest level water can reach inside the reservoir.
Once water reaches that height, any additional water should drain out.
This creates an air gap between the top of the reservoir and much of the growing soil.
Without an overflow, heavy rain could continue filling the bed until the entire root zone becomes saturated.
Position the overflow through the side wall at the intended maximum reservoir height.
Make sure the fitting is properly sealed where it passes through the liner.
Before proceeding, test it.
Put some water into the empty system and confirm that the overflow releases water correctly without leaking around the fitting.
Fixing this now is much easier than after filling the bed with hundreds of litres of soil.
Step 5: Add a Fill Pipe
Install a vertical pipe that reaches from above the soil surface down into the reservoir.
PVC pipe is commonly used.
The lower end should allow water to enter the reservoir easily rather than being sealed against the bottom.
A wider pipe is generally easier to fill using a hose or watering can.
Keep the upper opening accessible once plants are growing.
Most importantly for Malaysian homes, cover the opening.
A cap or suitable fine mesh helps prevent leaves, insects, and mosquitoes from accessing the reservoir.
Do not create an open pipe leading directly to stored water.
Step 6: Build the Reservoir Layer
There are several ways to create the water-storage zone.
Traditional DIY designs often use clean, washed gravel or another coarse mineral material.
More efficient designs may use drainage cells, crates, pipes, or purpose-made water-storage modules that create larger open spaces for water.
The advantage of an open-cell system is that it can store more water with less heavy stone.
Whichever approach you use, make sure the material:
is structurally strong,
does not contain contaminants,
allows water to move freely,
and can support the growing layers above.
Do not use random construction rubble simply because it is available.
Broken plaster, painted material, treated wood, unknown concrete waste, or contaminated debris does not belong in an edible growing system.
Step 7: Make Sure Water Can Wick Upward
A reservoir full of water is useless if the growing medium cannot reach it.
There needs to be a capillary connection between the stored water and the soil above.
In gravel-based beds, moisture can move through suitable media extending down into the reservoir zone.
Some designs use dedicated wicking columns filled with growing medium.
The important principle is continuous contact.
Water needs a pathway from the reservoir into material that can pull moisture upward.
Avoid large empty gaps between the reservoir and the soil.
Step 8: Add a Separator Where Appropriate
Depending on the reservoir design, install a suitable permeable geotextile fabric above the coarse storage material.
This helps prevent large quantities of growing soil from washing downward while still allowing water to move through.
Do not use an impermeable plastic sheet between the water and soil.
That would defeat the purpose of wicking.
The separator needs to allow moisture movement.
Install it so the soil cannot easily escape around the edges.
Step 9: Add the Growing Medium
Now comes the part your vegetables will actually live in.
Do not fill a wicking bed with pure compost.
You need a growing medium that can:
wick water,
hold useful moisture,
retain nutrients,
and still contain enough air for roots.
A balanced mix may contain good-quality soil, finished compost, and other appropriate organic or structural ingredients.
Avoid extremely heavy clay because it can remain saturated and poorly aerated.
At the opposite extreme, a very coarse sandy mixture may not wick effectively enough from the reservoir.
You are looking for a moisture-retentive but well-structured medium.
The ideal mixture depends partly on what materials are available locally.
How Deep Should the Growing Layer Be?
You need enough growing depth for the crops you intend to plant.
Leafy greens and small herbs have relatively shallow root systems.
Chillies, tomatoes, brinjal, cucumbers, and larger vegetables benefit from a deeper root zone.
However, there is another consideration: water can only wick upward efficiently through a limited distance.
If you build an extremely deep soil layer above a shallow reservoir, the surface may remain too dry for young plants.
For a typical home vegetable wicking bed, keeping the effective wicking distance somewhere around 30 cm or less above the reservoir is a practical design starting point, although actual performance depends on the growing medium.
This is one reason extremely tall raised beds are not automatically better wicking beds.
Step 10: Fill the Reservoir and Test the System
Before planting anything, fill the reservoir using the fill pipe.
Keep adding water until you see water emerging from the overflow.
Now you know the reservoir is full.
Check:
Does the liner leak?
Does the overflow work?
Does the fill pipe drain properly?
Is water appearing somewhere it should not?
Leave the system for a while and check again.
It is much better to discover a plumbing problem before planting RM100 worth of seedlings.
Step 11: Moisturise the Soil from Above
When the bed is first built, do not expect a completely dry upper soil layer to instantly wick all the water it needs from below.
Water the growing medium thoroughly from above during setup.
This creates continuous moisture throughout the profile and helps establish the capillary connection.
After planting seedlings, continue watering them from above while their root systems establish.
Once plants are growing strongly and the wicking system is functioning, the reservoir can provide most routine moisture.
Step 12: Add Mulch
A layer of appropriate organic mulch can make the system even more efficient.
Mulch reduces surface evaporation, protects the soil from intense Malaysian rain, moderates temperature, and gradually contributes organic matter.
Dry leaves, suitable plant residues, or other appropriate organic mulches can work well.
Keep mulch away from direct contact with vegetable stems and tree trunks.
With a reservoir below and mulch above, moisture levels can remain much more stable than in an exposed conventional raised bed.
How Often Should You Fill the Reservoir?
There is no fixed schedule.
During hot weather with mature fruiting plants, the reservoir may empty relatively quickly.
During cloudy weather or prolonged rain, you may barely need to refill it.
Rather than automatically adding water every two days, learn how quickly your particular bed uses its stored supply.
If possible, incorporate a simple water-level indicator into the fill pipe or use a dipstick to estimate the remaining water.
Over time, you will learn the rhythm of the bed.
Let the Reservoir Drop Occasionally
Do not feel compelled to keep the reservoir permanently filled to maximum capacity.
Allowing the level to fall helps maintain aerated conditions within the system.
During Malaysia’s wetter periods, deliberately leaving some reservoir capacity empty can also give incoming rain somewhere to go before the overflow activates.
If thunderstorms are forecast repeatedly, there is little reason to fill the reservoir manually beforehand.
Let the weather do some of the work.
Mosquito Prevention Must Be Part of the Design
Malaysia’s mosquito situation means this cannot be an afterthought.
The water reservoir should be fully enclosed from adult mosquitoes.
Cap the fill pipe.
Fit suitable mesh to the overflow if necessary.
Check that the overflow still drains freely.
Look for cracks, uncovered openings, or external trays where standing water collects.
The reservoir itself can remain wet for long periods, so physical exclusion is far better than trying to treat mosquito larvae later.
Be Careful with Fertiliser
Because a wicking bed stores water rather than allowing every irrigation cycle to drain freely through the bottom, salts from fertilisers can accumulate over time.
Use fertilisers at sensible rates.
Do not keep adding concentrated liquid fertiliser to the reservoir unless the system was specifically designed and managed for that purpose.
Occasional top watering and controlled flushing may be beneficial if salts begin accumulating, depending on how the bed is constructed.
A soil test can also become useful for long-term beds that receive repeated compost and fertiliser applications.
What Should You Grow?
Wicking beds are especially useful for crops that prefer reasonably consistent soil moisture.
Good candidates include:
chillies,
tomatoes,
brinjal,
cucumbers,
leafy vegetables,
basil,
mint,
okra,
and many other commonly grown edible plants.
Plants that strongly prefer drying between watering cycles may be less suitable.
As always, build the system around what you actually want to grow.
What Are the Most Common Wicking-Bed Mistakes?
One is building without an overflow.
Another is making the soil layer too deep for effective wicking.
Others include:
using unsuitable dense soil,
leaving mosquito access to the reservoir,
using contaminated construction material,
forgetting to test for leaks,
constantly keeping the reservoir completely full,
and assuming the system no longer needs observation.
The most complicated wicking bed is not necessarily the best one.
A simple system with a reliable reservoir, overflow, fill pipe, appropriate growing medium, and good mosquito protection is enough.
Is It Worth Building One Yourself?
If you are already planning a new raised bed, a wicking system can be worth the extra effort.
It is particularly attractive for Malaysian homes where vegetables dry quickly during hot spells or where daily watering has become inconvenient.
However, if you already have a perfectly functional raised bed, rebuilding everything may not be necessary.
Adding mulch and simple drip irrigation could achieve much of the same convenience for less money.
Build a wicking bed because it solves a real problem.
Not because every edible garden suddenly needs one.
At the end of the day, building a wicking bed for Malaysian weather requires balancing water storage with reliable overflow. Create a strong waterproof reservoir, give water a pathway into the soil, provide enough root depth without exceeding the effective wicking range, cover all mosquito access points, and make sure heavy tropical rain can escape safely. When those basics are right, the system can provide vegetables with remarkably consistent moisture while reducing the amount of daily watering you need to do.
Planning to build your own wicking bed? Tag @projectharvest.my on Instagram and share your sketch, reservoir construction, overflow setup, first planting, or finished DIY bed with us. We’d especially love to see how Malaysian gardeners adapt these systems for terrace houses, backyards, and tropical rainfall — your build could become the inspiration another gardener needs to create their first self-watering vegetable bed.